Link to previous chapter: 环境设置-1
2. 开始第一个 Scarpy 项目
2.1 创建项目
因为我们本地并没有scrapy的executable,需要启动一个ad-hoc的容器并在容器里面操作, 进入容器:
1
| > docker-compose run --rm scrapy
|
现在开始创建我们的project
1
2
3
| > cd /app
> scrapy startproject app_trend
> cd app_trend
|
这样子会生成一个 app_trend folder, 其中主要的文件目录是:
1
2
3
4
5
6
7
8
9
10
11
| tutorial/
scrapy.cfg # deploy configuration file
tutorial/ # project's Python module, you'll import your code from here
__init__.py
items.py # project items definition file
middlewares.py # project middlewares file
pipelines.py # project pipelines file
settings.py # project settings file
spiders/ # !!! a directory where you'll later put your spiders
__init__.py
|
我们将会在 spiders/ folder 里面编写我们自己的 spider
2.2 第一个 spider
Filename: spiders/top50_spider.py
1
2
3
4
5
6
7
8
9
10
11
12
13
14
15
16
17
18
19
20
21
22
23
24
25
26
27
28
29
30
31
32
33
34
35
36
| import scrapy
class Top50Spider(scrapy.Spider):
name = "top50"
def start_requests(self):
urls = [
'https://www.appannie.com/en/apps/ios/top/'
]
for url in urls:
yield scrapy.Request(
url=url, callback=self.parse,
headers={
"accept": "text/html,application/xhtml+xml,application/xml;q=0.9,image/webp,image/apng,*/*;q=0.8,application/signed-exchange;v=b3;q=0.9",
"accept-language": "zh-CN,zh;q=0.9,en;q=0.8,en-GB;q=0.7,en-US;q=0.6,zh-TW;q=0.5,ja;q=0.4",
"accept-encoding": "gzip, deflate, br",
"cache-control": "max-age=0",
"sec-fetch-dest": "document",
"sec-fetch-mode": "navigate",
"sec-fetch-site": "none",
"sec-fetch-user": "?1",
"upgrade-insecure-requests": "1",
"user-agent": "Mozilla/5.0 (Windows NT 10.0; Win64; x64) AppleWebKit/537.36 (KHTML, like Gecko) Chrome/89.0.4389.82 Safari/537.36 Edg/89.0.774.50",
})
def parse(self, response):
for ranking in response.xpath('//div[count(a[contains(@href, "en/apps")])>=40]'):
category = ranking.css("h4::text").get()
for app in ranking.xpath('.//a[contains(@href, "en/apps")]'):
items = app.xpath('.//p/text()').getall()
yield {
'category': category,
'rank': items[0],
'name': items[1],
'company': items[2],
}
|
这里面特别加上了一些headers,特别是`user-agent`是为了防止服务器认为我们是机器人而直接返回503 Error
2.2.1 网页分析:xpath 和 css selector
Scrapy默认提供了非常强大的css和xpath selector, 参考 W3Schools
已知页面的structure:
1
2
3
4
5
6
7
8
9
10
11
12
13
14
15
16
17
18
19
| <html>
<body>
<div> // Top Free App
<h4>Free</h4>
<a href="en/apps/..."><p>app_rank</p><p>name</p><p>company</p></a>
...
</div>
<div> // Top Paid App
<h4>Free</h4>
<a href="en/apps/..."><p>app_rank</p><p>name</p><p>company</p></a>
...
</div>
<div> // Top Grossing App
<h4>Free</h4>
<a href="en/apps/..."><p>app_rank</p><p>name</p><p>company</p></a>
...
</div>
</body>
</html>
|
其中每个<div>里面会列出类别以及包含50个app的rank
这里我们用到了四个:
response.xpath('//div[count(a[contains(@href, "en/apps")])>=40]'): 找到一个div并且里面有超过40个link,每个link都指向 en/apps/...css("h4::text"): 提取 h4 里面的文字xpath('.//a[contains(@href, "en/apps")]'): 提取链接xpath('.//p/text()'): 找到每个段落
2.3 运行
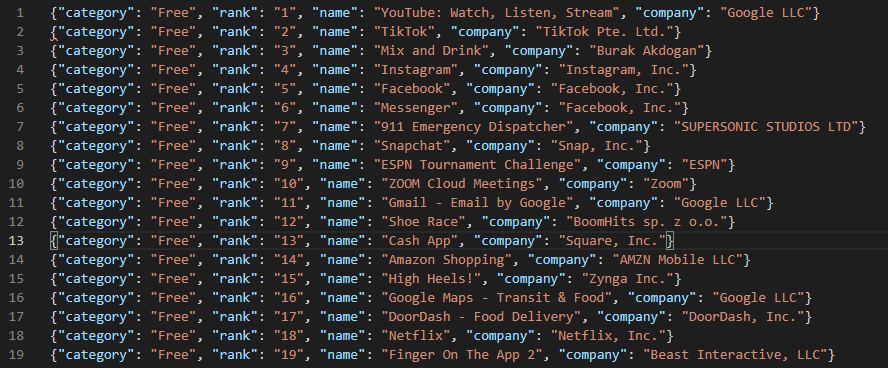
可以看到我们能够拿到150个结果了
2.4 输出 items
既然已经能够生成需要的数据,那么我们可以使用 Pipeline 来把处理过的内容输出到磁盘上
Filename: app_rank/pipelines.py
1
2
3
4
5
6
7
8
9
10
11
12
13
14
15
16
17
18
19
20
21
22
23
24
25
26
| from datetime import datetime
from itemadapter import ItemAdapter
from scrapy.exporters import JsonLinesItemExporter
class AppTrendPipeline:
def __init__(self):
self.files = {}
def open_spider(self, spider):
import os
print(os.getcwd())
spider.logger.info("Current path: %s", os.getcwd())
now = datetime.now()
file = open('json/{}.json'.format(now.strftime("%d_%m_%Y_%H_%M_%S")), 'w+b')
self.files[spider] = file
self.exporter = JsonLinesItemExporter(file)
self.exporter.start_exporting()
def close_spider(self, spider):
self.exporter.finish_exporting()
file = self.files.pop(spider)
file.close()
def process_item(self, item, spider):
self.exporter.export_item(item)
return item
|
我们使用了 JsonLinesItemExporter 将每一个Item输出到了本地的 .json 文件中:
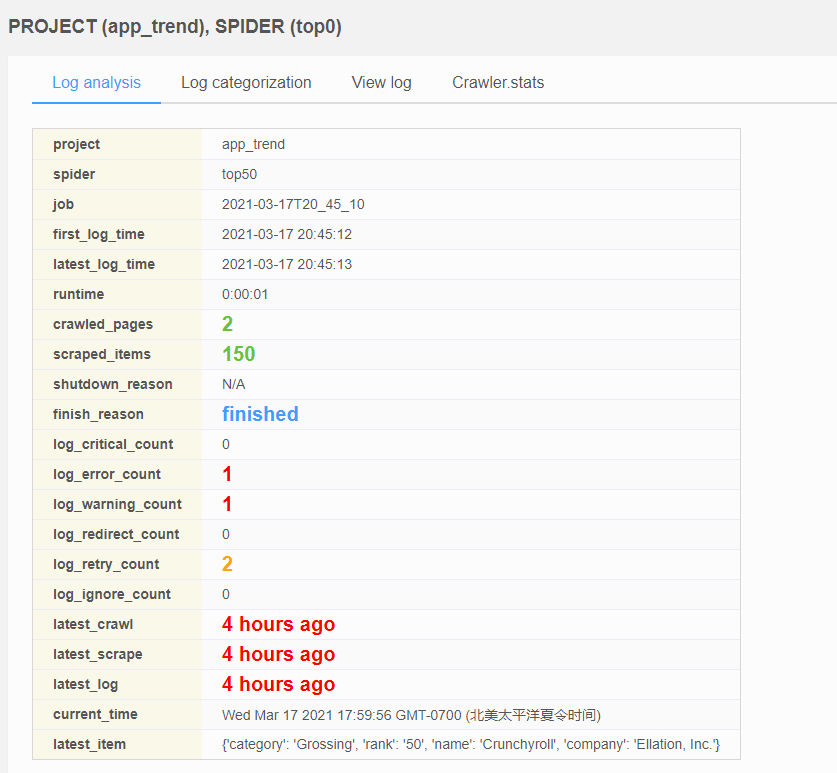
2.5 通过网页控制台来运行我们的spider
访问 http://localhost 应该就能看到控制台,以及我们增加了一个同为localhost的worker

- 进入 屏幕左侧
Deploy Project 选项, 选择我们创建的 app_trend 项目,并且选择 Package & Deploy
- 进入 屏幕左侧
Run Spider 选项, 选择我们的项目和spider,点击 Check CMD 生成命令,这里也可以选择计划任务设置定时执行
- 点击
Run Spider 按钮
第一个task开始运行,选择 Jobs 可以看到现在的jobs,点击第一个task的 Stats已经完成,我们抓取到了150个条目